The Art of Application: A Comprehensive Guide to Proper Makeup Application
Related Articles: The Art of Application: A Comprehensive Guide to Proper Makeup Application
Introduction
In this auspicious occasion, we are delighted to delve into the intriguing topic related to The Art of Application: A Comprehensive Guide to Proper Makeup Application. Let’s weave interesting information and offer fresh perspectives to the readers.
Table of Content
The Art of Application: A Comprehensive Guide to Proper Makeup Application
Makeup, a tool of self-expression and enhancement, can be a powerful instrument when applied correctly. Beyond simply covering imperfections, proper makeup application enhances natural features, sculpts contours, and elevates one’s overall appearance. This comprehensive guide explores the intricacies of makeup application, offering a step-by-step approach to achieving flawless results.
Foundation: The Canvas for Your Look
Foundation, the base of any makeup look, serves as the canvas upon which all other products are applied. Selecting the right foundation is crucial. It should match your skin tone perfectly, providing a seamless blend that does not appear cakey or unnatural.
1. Preparation:
- Cleanse and Exfoliate: Begin with a clean face. Exfoliate gently to remove dead skin cells, creating a smooth surface for foundation application.
- Moisturize: Apply a lightweight moisturizer suited for your skin type. This hydrates the skin and helps the foundation glide on smoothly.
- Primer: A primer acts as a barrier between your skin and foundation, creating a smooth, even surface that helps makeup last longer.
2. Application:
- Matching Your Foundation: Choose a foundation shade that perfectly complements your skin tone. Test swatches on your jawline to ensure a seamless blend with your natural skin color.
- Application Tools: Choose a tool that suits your preference and skin type. A brush provides a natural finish, a sponge offers a dewy effect, and fingers allow for a more personalized application.
- Technique: Apply foundation in thin, even layers, starting from the center of the face and blending outwards. Pay attention to areas like the nose, chin, and hairline, ensuring a seamless transition.
Concealer: Camouflaging Imperfections
Concealer, a targeted solution for imperfections, helps to conceal dark circles, blemishes, and redness. Selecting the right concealer shade is paramount. It should be one to two shades lighter than your foundation for a brightening effect.
1. Application:
- Under Eye: Apply a small amount of concealer under the eyes in a triangular shape, starting from the inner corner and blending outwards.
- Blemishes: Use a small brush or your finger to dab concealer directly onto blemishes, blending carefully.
- Redness: Apply a small amount of green-toned concealer to neutralize redness, followed by your regular concealer.
Powder: Setting the Stage for Longevity
Powder, a key element in achieving a long-lasting makeup look, sets the foundation and concealer, preventing creasing and oiliness. Loose powder offers a light, natural finish, while pressed powder provides a more matte effect.
1. Application:
- Setting Foundation: Use a large, fluffy brush to apply a light dusting of powder over the entire face, focusing on areas prone to oiliness (T-zone).
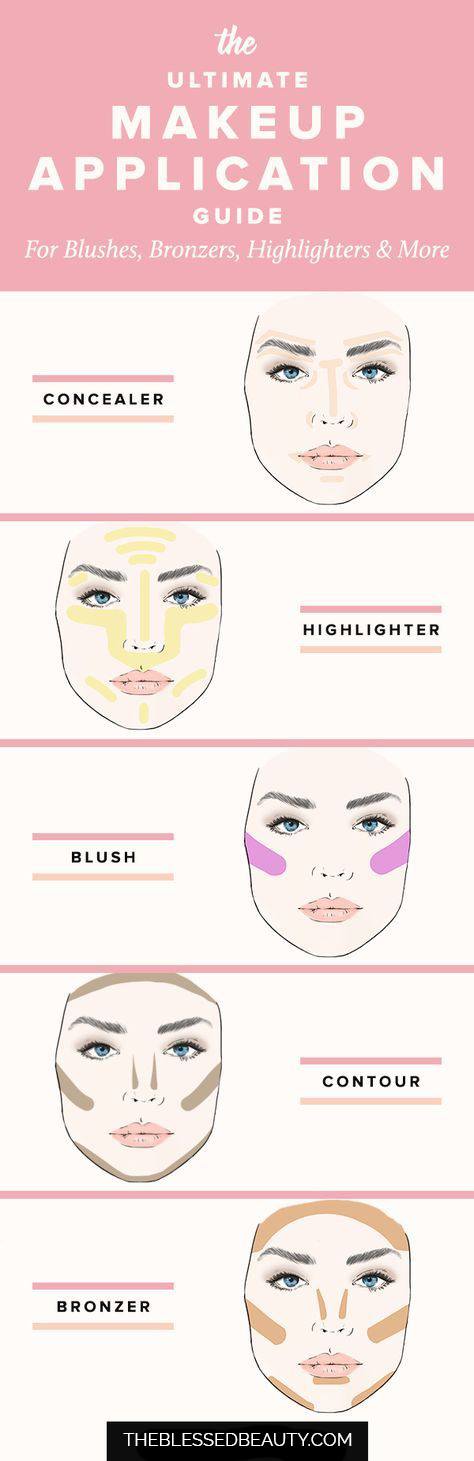
- Contouring: Use a contouring brush to apply bronzer or a darker shade of powder beneath the cheekbones, along the temples, and under the jawline to create dimension.
- Highlighting: Apply a highlighter to the brow bone, cheekbones, cupid’s bow, and bridge of the nose to add luminosity and definition.
Eyeshadow: Enhancing the Eyes
Eyeshadow, a versatile tool for enhancing eye shape and adding depth, can be applied in various shades and textures. From subtle neutrals to vibrant hues, the options are endless.
1. Preparation:
- Primer: Apply an eyeshadow primer to create a smooth base for eyeshadow, ensuring long-lasting color payoff.
- Blending Brushes: Invest in a variety of blending brushes to achieve seamless transitions between shades.
2. Application:
- Transition Shade: Start with a neutral transition shade, applying it to the crease of the eyelid to create depth.
- Lid Shade: Apply a lighter shade to the center of the eyelid, blending outwards to create a soft, luminous effect.
- Crease Shade: Use a darker shade in the crease to add dimension and definition.
- Highlighting: Apply a shimmery highlight to the inner corner of the eye and brow bone to brighten and lift the eye area.
Eyeliner: Defining the Eye Contour
Eyeliner, a powerful tool for defining the eye contour, can be used to create a range of looks, from subtle to dramatic. Liquid eyeliner offers precise lines, while pencil eyeliner provides a softer, smudgeable effect.
1. Application:
- Upper Lashline: Apply eyeliner along the upper lashline, starting from the inner corner and extending outwards.
- Winged Liner: For a dramatic effect, create a winged liner by extending the eyeliner outwards and upwards, forming a sharp angle.
- Waterline: Apply a nude or white eyeliner to the waterline to brighten the eyes and make them appear larger.
Mascara: Enhancing the Lashes
Mascara, the final touch for enhancing the lashes, adds volume, length, and definition. Choose a mascara formula that complements your desired effect.
1. Application:
- Wiggle and Roll: Wiggle the mascara wand from the base of the lashes to the tips, rolling it slightly to ensure even coverage.
- Multiple Coats: Apply multiple coats of mascara for a dramatic effect, allowing each coat to dry before applying the next.
Lipstick: Completing the Look
Lipstick, the final touch in any makeup look, adds color and definition to the lips. From bold reds to nude shades, the options are endless.
1. Preparation:
- Exfoliate: Exfoliate the lips gently to remove dry skin and create a smooth surface for lipstick application.
- Lip Liner: Use a lip liner to define the lip shape and prevent lipstick from bleeding.
2. Application:
- Lip Brush: Use a lip brush for precise application, ensuring an even distribution of color.
- Blotting: After applying lipstick, blot your lips with a tissue to remove excess product and set the color.
The Importance of Practice and Experimentation
Mastering makeup application requires practice and experimentation. It is a journey of self-discovery, allowing you to explore different techniques and styles to find what works best for you. Embrace the process, experiment with different products and techniques, and discover the transformative power of makeup.
FAQs on Applying Makeup Properly
Q: What are the essential makeup tools I need to start?
A: Essential makeup tools include a foundation brush, a blending sponge, a powder brush, an eyeshadow brush set, an eyeliner brush, a mascara wand, and a lip brush.
Q: How do I choose the right foundation shade for my skin tone?
A: Test foundation swatches on your jawline to ensure a seamless blend with your natural skin color. Look for a shade that disappears into your skin, not one that stands out.
Q: How can I prevent my makeup from creasing?
A: Use a primer to create a smooth base for your makeup. Set your foundation and concealer with powder to prevent creasing.
Q: What are some tips for applying eyeshadow?
A: Use a light transition shade in the crease, a lighter shade on the lid, and a darker shade to add depth to the crease. Blend carefully for a seamless transition between shades.
Q: How do I achieve a perfect winged eyeliner?
A: Start with a thin line along the upper lashline, then extend the line outwards and upwards, forming a sharp angle. Use a steady hand and practice to perfect your technique.
Q: How do I choose the right lipstick shade for my skin tone?
A: Fair skin tones complement nude, pink, and coral shades. Medium skin tones can wear a wide range of colors, including reds, oranges, and plums. Darker skin tones look stunning in bold reds, browns, and berry shades.
Tips for Applying Makeup Properly
- Clean Your Brushes Regularly: Clean your makeup brushes regularly to prevent bacteria buildup and ensure a clean application.
- Use Natural Lighting: Apply your makeup in natural lighting to ensure accurate color matching.
- Less is More: Start with a light hand and build up color gradually. It is easier to add more than to remove excess product.
- Practice Makes Perfect: Practice applying your makeup regularly to refine your technique and find what works best for you.
- Experiment and Have Fun: Don’t be afraid to experiment with different products and techniques to find your unique style.
Conclusion
Applying makeup properly is an art form that takes practice and experimentation. By following these steps and incorporating the provided tips, you can achieve a flawless and natural look that enhances your features and boosts your confidence. Remember, makeup is a tool of self-expression, so experiment, explore, and enjoy the process of creating your perfect look. Let your makeup be a reflection of your inner beauty and confidence, allowing you to shine from within.


Closure
Thus, we hope this article has provided valuable insights into The Art of Application: A Comprehensive Guide to Proper Makeup Application. We hope you find this article informative and beneficial. See you in our next article!